Cabinet Door Samples: A Five-Point Inspection
A sample door is small enough to inspect properly, which is exactly why it is worth inspecting in a fixed order. CasaBuilt's range holds 16 doors across four profiles, and 8 of them are Shaker, so the same five checks can be run on half the range without hunting for a match. Profile, panel, finish, edge and hinge drilling each fail in a different way, and the order matters because a bad panel makes every later check harder to read.
Key takeaways
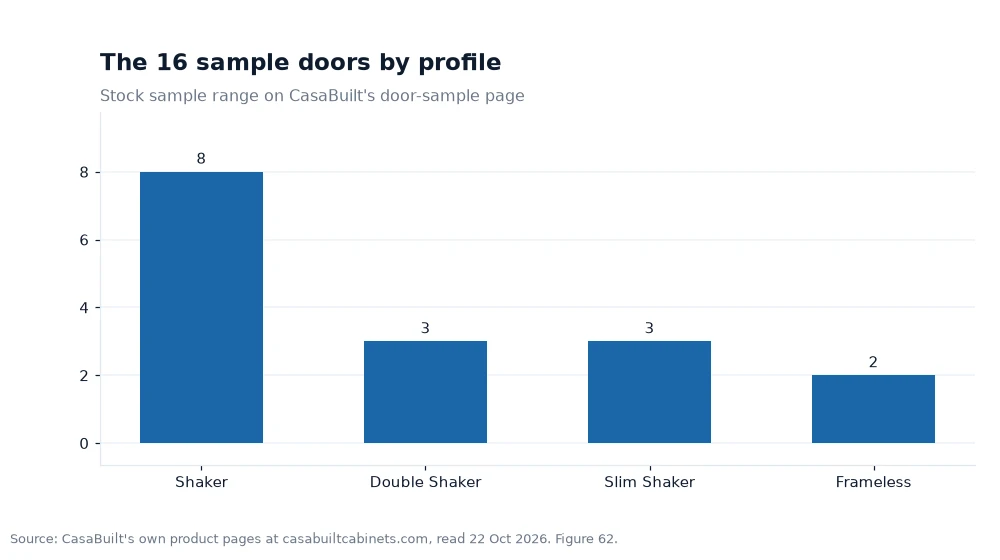
- The sample range covers four profiles: Shaker 8, Double Shaker 3, Slim Shaker 3 and Frameless 2.
- Inspect profile, panel, finish, edge and hinge drilling, in that order.
- Use a straightedge and a raking light; most defects are invisible face-on.
- Five checks across all 16 doors is 80 individual inspections.
Why the order of inspection matters
Start with geometry, because geometry distorts everything after it. If the frame lines are not parallel or the panel is not flat, the finish will look uneven even when it is perfect, and the edge will appear thicker on one side. A buyer who starts with color is judging a surface that is sitting on a warp. Ten seconds with a straightedge prevents that mistake.
The second reason is memory. Five checks in the same order on every door produce a comparable record. If you inspect the first door for color, the second for edges and the third for drilling, you cannot tell whether the difference you remember is real or just the order you looked. Write the five headings on a card and work down it for each sample.
Keep the lighting constant across the doors. One window, one lamp, one position on the counter. Moving between rooms between samples introduces the same variable the test is meant to remove, and a door judged in a bright hallway will rarely match the same door judged in a dim kitchen corner.
Points one and two: profile and panel
Profile is the shape the door presents before any finish is applied. On a Shaker door the frame surrounds a recessed panel, and the width of that frame sets the shadow line. A Slim Shaker narrows the frame, which leaves more flat panel and a quieter face across a run. A Double Shaker adds a second recess, so there are two shadow lines to keep parallel. A Frameless door has no face frame at all, which means the gap between doors becomes the visible geometry.
Check the profile in raking light, with the door upright. Look down each stile and rail and confirm the lines are straight and parallel. Then check the panel with a straightedge laid diagonally and horizontally. The panel should not rock, and the straightedge should not show a gap under the middle. A slight wave is normal in a painted panel; a visible cup or crown is not, because it will catch the light differently from the door beside it.
Press gently on the centre of the panel. A hollow click or a soft spot suggests the panel is thin or the frame joint is loose. Neither is a color problem, and neither will be fixed by a second coat.
Points three to five: finish, edge and drilling
The finish check is about evenness, not gloss. CasaBuilt publishes seven layers of paint with a UV protective finish, so the film should look continuous from frame to panel with no thin patch at a corner. Tilt the door until a window reflects across it and watch the reflection travel. It should move as one surface. If it breaks at the frame joint or dulls in a patch, the film is uneven.
The edge check is tactile. Run a fingertip around the four edges and feel for a sharp arris, a rough patch or a step where the face coat ends. A painted edge should wrap the corner, not stop at it. On a Frameless door this matters most, because there is no frame to distract from the edge, and the door edge is visible whenever the cabinet is open.
Drilling is the check buyers skip. If the sample arrives drilled for hinges, confirm that the cup bores sit at the same height on both stiles and that the screw holes are clean, not torn. CasaBuilt specifies soft-close concealed hinges with six-way adjustment, which gives an installer room to correct a small misalignment, but adjustment cannot rescue a bore that is in the wrong place. Order a cabinets door sample in each profile you are considering and compare the drilling side by side, not from memory.
The sample range is weighted to Shaker
Sixteen doors, four profiles, and half of them Shaker. That weighting is useful: the most common profile also has the largest sample pool, so a buyer can compare colors and finishes within Shaker without ordering a door in a profile they will not use. The slim and double profiles have three doors each, and Frameless has two, which is enough to judge geometry but not enough for a broad color comparison.
| Check | What to use | Pass standard | Profile that stresses it |
|---|---|---|---|
| 1. Profile | Eye, raking light | Stiles and rails straight and parallel | Double Shaker |
| 2. Panel | Straightedge | No rock, cup or crown | Shaker |
| 3. Finish | Window reflection | Seven-layer film even across face | Slim Shaker |
| 4. Edge | Fingertip and eye | Paint wraps the arris, no rough patch | Frameless |
| 5. Drilling | Straightedge across bores | Cups aligned, holes clean | All profiles |
The last column is the reason to inspect more than one profile. Each geometry hides a different defect: a double recess hides a twisted rail, a narrow frame hides a thin edge coat, and a frameless door hides nothing at all. If you only have time for two doors, choose the Shaker and the Frameless, because they sit at opposite ends of the construction.
The same five checks apply when the cabinets arrive in their cartons. Open one box, inspect the first door before signing for the delivery, and compare it with the sample you kept. CasaBuilt's packaging information explains how the flat-pack is packed, so you know which panel to lift out first without disturbing the rest of the order.
Worked example
The chart counts the sample range by profile: Shaker 8, Double Shaker 3, Slim Shaker 3 and Frameless 2. The four values add to 16, matching the published sample count. Shaker is 8 divided by 16, or 50%. Double Shaker and Slim Shaker are each 3 divided by 16, or 18.75%. Frameless is 2 divided by 16, or 12.5%. Shaker is 8 divided by 2, or 4 times the Frameless count.
Run five checks on every door and the total is 16 times 5, or 80 inspections. Shaker accounts for 8 times 5, or 40 of them. Each three-door profile accounts for 15, and Frameless accounts for 10. At $9.99 per door, the Shaker block costs 8 times $9.99, or $79.92, and the full range costs 16 times $9.99, or $159.84. If time is short, the 40 Shaker checks cover half the range for half the money.
Frequently asked questions
What are the five checks on a door sample?
Profile, panel, finish, edge and hinge drilling. Profile and panel come first because geometry affects how the other three read. Finish and edge come next, and drilling is last because it is the easiest to overlook and the hardest to correct after installation.
Do I need a tool to inspect a sample?
A straightedge and a window are enough. The straightedge checks the panel for rock or cup, and the window provides the raking light that reveals an uneven finish or a thin edge coat. A fingertip is the third tool, for the edge and the frame joint.
How many profiles are in the sample range?
Four: Shaker, Double Shaker, Slim Shaker and Frameless. The published counts are 8, 3, 3 and 2, which total 16 doors. Each sample is priced at $9.99 and the fee is refundable with a cabinet purchase.
Work down the card, door by door
Write the five checks on a card, set one lamp and one window as your light source, and work through the samples in the same order. Reject on geometry before you discuss color, and keep the rejected door as a reference for what a bad panel or a thin edge looks like. A sample costs $9.99; a kitchen door that fails the same check after installation costs a replacement and a return visit.
Figures quoted here come from the manufacturer's own website, read 22 Oct 2026[1].